MD0: Difference between revisions
SnakeTuning (talk | contribs) No edit summary |
SnakeTuning (talk | contribs) No edit summary |
||
| Line 1: | Line 1: | ||
{{DISPLAYTITLE:SNAKE MINI DIZZY}} | {{DISPLAYTITLE:SNAKE MINI DIZZY}} | ||
[[File:MD0_Device.jpg|left|thumb|500px|SNAKE MINI DIZZY]] | [[File:MD0_Device.jpg|left|thumb|500px|SNAKE MINI DIZZY]] | ||
<div class="toclimit-2">__TOC__</div> | |||
=Description= | =Description= | ||
{{MD0_Description}}<br clear=all> | {{MD0_Description}}<br clear=all> | ||
| Line 11: | Line 12: | ||
*Compatible with OEM and Standalone ECUs. | *Compatible with OEM and Standalone ECUs. | ||
= | =Initial Configuration= | ||
{{Note|warn|Before installation [[MD0|SNAKE MINI DIZZY]] must be configured to match your engine model.}} | |||
{{Note|warn| | |||
= | ==Set Engine Model== | ||
[[File:MD0_Configure_01.png|center|Before installation [[MD0|SNAKE MINI DIZZY]] must be configured to match your engine model.]] | [[File:MD0_Configure_01.png|center|Before installation [[MD0|SNAKE MINI DIZZY]] must be configured to match your engine model.]] | ||
= | ==Install Device== | ||
[[File:MD0_Install_01_Remove_OEM_Dizzy.jpg|thumb|right|STEP 1: Remove OEM Distributor ]] | [[File:MD0_Install_01_Remove_OEM_Dizzy.jpg|thumb|right|STEP 1: Remove OEM Distributor ]] | ||
'''STEP 1: Remove OEM Distributor''' | '''STEP 1: Remove OEM Distributor''' | ||
| Line 29: | Line 25: | ||
*Remove the distributor mounting bolts | *Remove the distributor mounting bolts | ||
*Remove distributor from cylinder head. | *Remove distributor from cylinder head. | ||
[[File:MD0_Install_02_Remove_Parts.jpg|thumb|right|STEP 2: Remove following parts from the Distributor]] | [[File:MD0_Install_02_Remove_Parts.jpg|thumb|right|STEP 2: Remove following parts from the Distributor]] | ||
| Line 37: | Line 32: | ||
*Pin | *Pin | ||
*Pin retainer | *Pin retainer | ||
[[File:MD0_Install_03_Install_Coupling.jpg|thumb|right|STEP 3: Install Coupling to Device]] | [[File:MD0_Install_03_Install_Coupling.jpg|thumb|right|STEP 3: Install Coupling to Device]] | ||
| Line 45: | Line 39: | ||
*Drive in the pin | *Drive in the pin | ||
*Secure it with the pin retainer | *Secure it with the pin retainer | ||
[[File:MD0_Install_04_Install_Device.jpg|thumb|right|STEP 4: Install Device to cylinder head]] | [[File:MD0_Install_04_Install_Device.jpg|thumb|right|STEP 4: Install Device to cylinder head]] | ||
| Line 57: | Line 50: | ||
<br clear=all> | <br clear=all> | ||
=Bluetooth Connection= | =OEM ECU= | ||
{{Note|warn|OEM ECUs must be modified to [[MD0_TECH|Accept Low Voltage Signals]]. See guides below.}} | |||
==ECU Modification (Required!)== | |||
{{MD0_Guides}} | |||
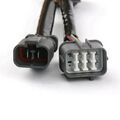
==Connector Functions== | |||
[[File:MD0_Connectors.jpg|thumb|right|SNAKE MINI DIZZY Connectors]] | |||
Here are the two Connectors on the [[MD0|SNAKE MINI DIZZY]] device. | |||
* '''6-pin Male Plug'''. Connect to the Engine Loom via Distributor Adapter. | |||
* '''6-pin Female Plug'''. Connect to the [[MD0|SNAKE MINI DIZZY]]'s Coil Harness. | |||
<br clear=all> | |||
==Distributor Adapters== | |||
{{MD0_Plugs}} | |||
==Config Output Mode== | |||
{{Note|warn|To work properly, the output mode must be set to '''OEM ECU'''}} | |||
[[File:MD0_Mode_OEM.jpg|thumb|right|OEM ECU Output Mode]] | |||
* Connect via Bluetooth (see [[#Bluetooth Connection|Bluetooth Connection]]). | |||
* Go to the '''Mode''' tab. | |||
* Select '''OEM ECU''' and click '''Apply''' | |||
<br clear=all> | |||
=Standalone ECU= | |||
{{Note|warn|To work with Standalone ECUs, Device Firmware must be updated to version 1.1 or later.}} | |||
==Connector Functions== | |||
{{Note|info|Standalone Mode provides trigger pattern output only. Use ECU coil outputs.}} | |||
[[File:MD0_Connectors.jpg|thumb|right|SNAKE MINI DIZZY Connectors]] | |||
Here are the two Connectors on the [[MD0|SNAKE MINI DIZZY]] device. | |||
* '''6-pin Male Plug'''. <span style="color:red>NOT USED!</span> | |||
* '''6-pin Female Plug'''. Connect to the Engine Loom via Universal Pigtail Connector. | |||
<br clear=all> | |||
==Pigtail Connector== | |||
[[File:MD0_Pigtail.jpg|thumb|right|Pigtail Connector Pinout]] | |||
* '''Wthie''': +12V Power | |||
* '''Red''': Cylinder Position Output. | |||
* '''Yellow''': Crankshaft Position Output. | |||
==Set Output Mode== | |||
{{Note|warn|To work properly, the output mode must be set to '''Standalone'''}} | |||
[[File:MD0_Mode_Standalone.jpg|thumb|right|Standalone Output Mode]] | |||
* Connect via Bluetooth (see [[#Bluetooth Connection|Bluetooth Connection]]). | |||
* Go to the '''Mode''' tab. | |||
* Select '''Standalone''' and click '''Apply''' | |||
<br clear=all> | |||
==Config ECU Inputs== | |||
In Standalone Mode Device outputs positive square-wave pulses, like a typical Hall-effect sensor.</br> | |||
ECU inputs must be configured as follows: | |||
* '''ECU input''': Must be Pulled Down. | |||
* '''Signal Type''': Hall Sensor. | |||
* '''Signal Edge''': Rising. | |||
==Trigger Waveform== | |||
[[File:MD0_Trigger_Waveform.jpg|center|Trigger Waveform]] | |||
=Service Tool= | |||
==Bluetooth Connection== | |||
{{Note|reminder|[[MD0|SNAKE MINI DIZZY]] has a built-in Bluetooth and a PC Service Tool.}} | {{Note|reminder|[[MD0|SNAKE MINI DIZZY]] has a built-in Bluetooth and a PC Service Tool.}} | ||
[[File:MD0_Bluetooth_01.jpg|thumb|right|Pairing a new Device]] | [[File:MD0_Bluetooth_01.jpg|thumb|right|Pairing a new Device]] | ||
| Line 69: | Line 123: | ||
*When pairing is complete, you will see the device Name '''MD0-XXXXX''' and status <span style="color:green>Online</span>. | *When pairing is complete, you will see the device Name '''MD0-XXXXX''' and status <span style="color:green>Online</span>. | ||
<br clear=all> | <br clear=all> | ||
[[File:MD0_Bluetooth_02.jpg|thumb|right|Reconnect (After First Pairing)]] | [[File:MD0_Bluetooth_02.jpg|thumb|right|Reconnect (After First Pairing)]] | ||
| Line 78: | Line 131: | ||
{{Note|info|If you need to connect to another device, click '''Search'''. The Service Tool will remove the currently paired device and start searching for available devices.}} | {{Note|info|If you need to connect to another device, click '''Search'''. The Service Tool will remove the currently paired device and start searching for available devices.}} | ||
<br clear=all> | <br clear=all> | ||
==Firmware Update== | |||
[[File:MD0_Update.jpg|thumb|right|Firmware Update]] | |||
* Go to the '''Firmware''' tab. | |||
* Click '''Check'''. | |||
* If an update is available, click '''Update'''. | |||
Revision as of 23:16, 8 January 2026

Description
The world's smallest device designed to completely remove the OEM distributor and convert to Individual Coils.
Despite the age of Honda's "Distributor Era" engines (B, D, F and H series), they are still very popular in the tuning community. A significant drawback of these older engines is the distributor ignition system, which includes a high-voltage section and “temperamental” VR sensors.
Our Device eliminates these shortcomings, enhancing engine performance and reliability.
Advantages
- Improved ignition timing precision up to 0.1 deg at 14000 RPM.
- Better spark energy without the inefficiencies of a traditional distributor system.
- Easy Setup via Bluetooth Connection.
- Less cluttered engine compartment, making maintenance and modifications easier.
- Compatible with OEM and Standalone ECUs.
Initial Configuration
Set Engine Model

Install Device

STEP 1: Remove OEM Distributor
- Disconnect Connector(s) from the distributor
- Disconnect the plug wires from the cap
- Remove the distributor mounting bolts
- Remove distributor from cylinder head.

STEP 2: Remove following parts from the Distributor
- Thrust washer
- Coupling
- Pin
- Pin retainer

STEP 3: Install Coupling to Device
- Install Coupling to the shaft.
- Align the index mark of shaft and coupling.
- Drive in the pin
- Secure it with the pin retainer

STEP 4: Install Device to cylinder head
- Coat O-Ring with engine oil.
- Align offset of the lugs on the end of Device and its mating grooves in the Camshaft.
- Slip Device into position.
- Install and tighten one mounting bolt.
- Install Coils and Wiring.
- Connect Connector(s) to Device.
OEM ECU
ECU Modification (Required!)
Most Popular ECU Guides
- Chipped OBD1: Denshigiken M66207 ECU Guide
- Chipped OBD1: OKI M66207 ECU Guide
Search Guide by Car Model
90-93 Honda Accord 4.
- 90-93 Models: Denshigiken M66911 ECU Guide
93-97 Honda Accord 5. USA Spec.
- 93-95 Models: Denshigiken M66911 ECU Guide
- 96-97 Models: Denshigiken M66509 ECU Guide
93-97 Honda Accord 5. EUR Spec.
- 93-97 Models: Denshigiken M66911 ECU Guide
98-02 Honda Accord 6. USA Spec.
- 98-02 Models: Keihin M66589 ECU Guide
98-02 Honda Accord 6. EURO Spec.
- 98-02 Models: OKI M66589 ECU Guide (Regular O2)
- 98-02 Models: OKI SH7000 ECU Guide (Semi Wideband O2)
92-95 Honda Civic 5
- 92-95 Models: Denshigiken M66207 ECU Guide
94-01 Honda Civic 5.5. UK Spec.
- 94-97 Models: OKI M66207 ECU Guide
- 97-01 Models: OKI M66507 ECU Guide
96-00 Honda Civic 6.
- 96-98 Models: Denshigiken M66507 ECU Guide
- 99-00 Models: Keihin M66589 ECU Guide
95-01 Honda CR-V 1.
- 95 Models: Denshigiken D78334 ECU Guide
- 96-98 Models: Denshigiken M66507 ECU Guide
- 99-01 Models: Keihin M66589 ECU Guide
92-98 Honda CR-X DelSol.
- 92-95 Models: Denshigiken M66207 ECU Guide
- 96-98 Models: Denshigiken M66507 ECU Guide
92-97 Honda Domani.
- 92-97 Models: Denshigiken M66207 ECU Guide
89-93 Honda Integra 2.
- 89-91 Models: OBD0 ECUs not supported
- 92-93 Models: Denshigiken M66207 ECU Guide
93-01 Honda Integra 3.
- 93-95 Models: Denshigiken M66207 ECU Guide
- 96-99 Models: Denshigiken M66507 ECU Guide
- 00-01 Models: Keihin M66589 ECU Guide
92-96 Honda Prelude 4.
- 92-96 Models: Denshigiken M66911 ECU Guide
96-01 Honda Prelude 5.
- 96-01 Models: Denshigiken M66509 ECU Guide
95-99 Rover 400 Series. (D16 Engine)
- 95-97 Models: OKI M66207 ECU Guide
- 97-99 Models: OKI M66507 ECU Guide
99-05 Rover 45 Series (D16 Engine)
- 99-05 Models: OKI M66507 ECU Guide
Search Guide by ECU Hardware
OBD1 ECU Families
- Denshigiken M66207 ECU Guide
- OKI M66207 ECU Guide
- OKI M66507 ECU Guide
- Denshigiken M66911 ECU Guide
- Denshigiken D78334 ECU Guide
OBD2A ECU Families
- Denshigiken M66507 ECU Guide
- Denshigiken M66509 ECU Guide
OBD2B ECU Families
- Keihin M66589 ECU Guide
- OKI M66589 ECU Guide
- OKI SH7000 ECU Guide
Connector Functions

Here are the two Connectors on the SNAKE MINI DIZZY device.
- 6-pin Male Plug. Connect to the Engine Loom via Distributor Adapter.
- 6-pin Female Plug. Connect to the SNAKE MINI DIZZY's Coil Harness.
Distributor Adapters
OBD1 Type Plug
OBD2A Type Plug

OBD2B Type Plug


Config Output Mode

- Connect via Bluetooth (see Bluetooth Connection).
- Go to the Mode tab.
- Select OEM ECU and click Apply
Standalone ECU
Connector Functions
Here are the two Connectors on the SNAKE MINI DIZZY device.
- 6-pin Male Plug. NOT USED!
- 6-pin Female Plug. Connect to the Engine Loom via Universal Pigtail Connector.
Pigtail Connector

- Wthie: +12V Power
- Red: Cylinder Position Output.
- Yellow: Crankshaft Position Output.
Set Output Mode

- Connect via Bluetooth (see Bluetooth Connection).
- Go to the Mode tab.
- Select Standalone and click Apply
Config ECU Inputs
In Standalone Mode Device outputs positive square-wave pulses, like a typical Hall-effect sensor.
ECU inputs must be configured as follows:
- ECU input: Must be Pulled Down.
- Signal Type: Hall Sensor.
- Signal Edge: Rising.
Trigger Waveform

Service Tool
Bluetooth Connection

Pairing a New Device
When you connect to the device for the first time, the connection must be configured. Follow these steps:
- Turn ON the Ignition.
- Make sure Bluetooth is enabled on your PC.
- Launch Service Tool
- In the Device field you will see Name NONE and status Searching....
- Wait 10–20 seconds — the Service Tool will automatically find the device and set up the connection.
- When pairing is complete, you will see the device Name MD0-XXXXX and status Online.

Reconnect (After First Pairing)
After the first successful connection, the Service Tool will automatically reconnect to the paired device.
- In the Device field you will see Name MD0-XXXXX and status Connecting....
- After a successful reconnect, the status will change to Online.
Firmware Update

- Go to the Firmware tab.
- Click Check.
- If an update is available, click Update.